Thursday, February 28, 2008

Introduction

The use of digital probes for data collection has revolutionized the science of data collection. Interfaces and probes made by the Vernier Company will be used in the investigations featured on the Probing the Matter blog. Here you will find the resources and information necessary to carry out experiments designed to teach the principles of physical and biological science.
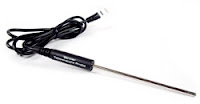
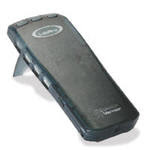
A Tutorial on the Use of the Temperature Probe and Lab Pro


To perform this tutorial, you should have connected a LabPro with a connected Stainless Steel Temperature Probe to your computer:

This tutorial will explain how to make simple measurements using a Temperature Probe and Logger Pro. You will also learn to perform some basic analysis of those data.To perform this tutorial, you will need
2 cups of water, one with hot water and the other one with cold water.
To access the tutorial, reduce the blog window and move it to the side of your screen (don't close it).
  • Double click the Logger Pro 3 icon on the desktop. When it opens reduce the window size and place it next to this blog.
  • When Logger Pro opens it will be on the page that contains a chart and graph to record temperature.
  • Go to the MENU bar athe top of the Logger Pro window and click on FILE. When the FILE menu drops down, click on OPEN.
  • A window will open that contains all of the listings for the experiments that Logger Pro can run. Open the TUTORIALS folder. It will be the last listing in the window.
  • Open the Tutorial listed as 01 Getting Started.cmbl.
  • Begin reading the page, following all of the directions.
  • After completing Tutorial number 01, do the next two (02 & 03) to prepare for the investigation on Melting and Freezing
  • Return here to the blog when the Tutorial is completed.


Freezing and Melting of Water

Freezing temperature is the temperature at which a substance turns from a liquid to a solid.
Melting temperature is the temperature at which a substance turns from a solid to a liquid.
Freezing temperature and melting temperature are characteristic properties. In this experiment, you will determine and compare the freezing and melting temperatures of water.

OBJECTIVES
In this experiment, you will
  • Use a computer to measure temperature.
  • Analyze graphs of your data to determine the freezing and melting temperatures of water.
  • Determine the relationship between the freezing and melting temperatures of water.
  • Apply the concepts studied in a new situation.

MATERIALS
  • computer 400 mL beaker
  • Vernier computer interface water one test tube
  • Logger Pro 10 mL graduated cylinder
  • Vernier Temperature Probe ice
  • ring stand salt
  • utility clamp spoon
PROCEDURE
Part I Freezing
1. Fill a 400 mL beaker 1/3 full with ice, then add 100 mL of water.

2. Put 5 mL of water into a test tube and use a utility clamp to fasten the test tube to a ring
stand. The test tube should be clamped above the water bath. Place the Temperature Probe
into the water inside the test tube.

3. Connect the Temperature Probe to the computer interface. Prepare the computer for data
collection by opening the file “03 Freezing and Melting” from the Physical Science w Vernier
folder.
4. When everything is ready, click to begin data collection. Then lower the test tube into
the ice-water bath.

5. Soon after lowering the test tube, add 5 spoons of salt to the beaker and stir with a spoon.
Continue to stir the ice-water bath during Part I.

6. Slightly, but continuously, move the probe during the first 10 minutes of Part I. Be careful to
keep the probe in, and not above, the ice as it forms. When 10 minutes have gone by, stop
moving the probe and allow it to freeze into the ice. Add more ice cubes to the ice-water bath
as the original ice cubes get smaller.

7. When 15 minutes have passed, data collection will stop. Keep the test tube submerged in the
ice-water bath until Step 10.

8. On the displayed graph, analyze the flat part of the curve to determine the freezing
temperature of water:
  • Move the mouse pointer to the beginning of the graph’s flat part. Press the mouse button and hold it down as you drag across the flat part to select it.
  • Click on the Statistics button, . The mean temperature value for the selected data is listed in the statistics box on the graph. Record this value as the freezing temperature in your data table.
  • Remove the statistics box.
Part II Melting

9. Store your data by choosing Store Latest Run from the Experiment menu. This stores the data so it can be used later. To hide the curve of your first data run, click the Temperature vertical axis label of the graph, click on More, and uncheck Run 1 Temperature. Click the Collect button.

10. Click to begin data collection. Then raise the test tube and fasten it in a position above
the ice-water bath. Do not move the Temperature Probe during Part II.

11. Dispose of the ice water as directed by your teacher. Obtain 250 mL of warm tap water in the beaker. When 12 minutes have passed, lower the test tube and its contents into this
warm-water bath.

12. When 15 minutes have passed, data collection will stop.

13. On the displayed graph, analyze the flat part of the curve to determine the melting
temperature of water:
  • Move the mouse pointer to the beginning of the graph’s flat part. Press the mouse button
  • and hold it down as you drag across the flat part to select it.
  • Click the Statistics button, . The mean temperature value for the selected data is listed in the statistics box on the graph. Record this value as the melting temperature in your data table.
  • To remove the statistics box, click on the upper-right corner of the box.
14. Print a graph of temperature vs. time showing both data runs:

  • Click the Temperature vertical-axis label of the graph. To display both temperature runs, click on More, and check the Run 1 and Latest Temperature boxes. Click .
  • Label both curves by choosing Text Annotation from the Insert menu, and typing “Freezing Curve” (or “Melting Curve”) in the edit box. Then drag each box and its arrow to clearly identify each curve.
  • Print copies of the graph as directed by your teacher.
OBSERVATIONS

DATA

  • Freezing temperature of water sample ______ °C

  • Melting temperature of water sample ______ °C

PROCESSING THE DATA

1. What happened to the water temperature during freezing? During melting?


2. According to your data and graph, what is the freezing temperature of water? The melting
temperature?


3. How does the freezing temperature of water compare to its melting temperature?


4. Phenyl salicylate has a freezing temperature of 41.5°C. In the space to the right, sketch and label a freezing curve for phenyl salicylate. Be sure to indicate the freezing temperature on the graph.

5. Using another color, draw a melting curve for phenyl salicylate on the same graph. Indicate the melting temperature on the curve.

Temperature (deg. C)

Time (min)

EXTENSION

1. Modify the procedure to study the freezing and melting temperatures of another substance
suggested by your teacher.